Monday, August 14, 2023

The Worlds Best Template for 1 on 1 Meetings

Welcome Reader!  You're likely here for one of 2 reasons:

1. My ingenious SEO manipulation helped you arrive here due to this post title.
2. We've talked about how I structure my 1:1s and you'd like the template.

If you simply want the template without explanation, click here for the Template.
Otherwise, see below for how I use the template and why it works.

Workflow for a 1:1 Meeting

This workflow is intended for people that keep recurring 1:1 meetings.
The workflow is fine for Manager/IC (individual contributor) or IC/IC meetings.

Managers derive value from the organized document created though this process.
The document makes it easy to reference back to current project status, and serves a collection of breadcrumbs during annual review.

Other ICs can use these organized breadcrumbs to circle back after a 1:1.
These documented breadcrumbs are incredibly helpful when either participant is a remote worker.

Before the Meeting (Meta)

Preparation is a curtesy to others, and shows you value their time.
I typically spend 50 minutes over the course of a week prepping for a 25min 1:1.

The Invite

If I don't already have a regular 1:1 with an intended participant, I reach out in advance and ask if it's alright to book a recurring 1:1.  Sometimes I'll first schedule a very informal 25min meet/greet chat to help determine if we need a regular 1:1.  If we do - I let them know:
  • The cadence (generally weekly if we work together closely, up to as far as monthly).
  • The length of the meeting (generally 25min with a few exceptions)
  • I'll schedule a recurring invite (I keep it something that they can edit


Before Each Session

I book 20-40min of focus time specifically to review the Next section in the 1:1 doc.


During that focus time I do the following:
  • Copy the dated meeting block for todays date.


  • Copy over any bullets from Next into the Results / Discussion


  • Try to add something fun at the end under Items of Interest 

    This can be work related or not - better if it's more targeted to shared interests over time.

    The end result will look something like this:

During of the Meeting

Start of the session

When starting this process with a new participant, I go out of my way to explain:

"Here's the template I use for 1:1s, during the week you're welcome to add any bullets you want to the Next section.  
About 45min before our 1:1 I'll copy over anything you've written there, along with my notes into the outline for our next meeting"

For the first few sessions, I typically start of the meeting saying something like:
"I'm going to share my screen and run through the outline"

This almost always comes off as "stiff" or overly structured at first.  
With practice, I think I've improved that experience - but it's OK if this part feels a bit awkward.  
It is awkward, but once both people are comfortable with the ritual of the meeting it tends to become something comfortable and expected.

Working the Outline


Results

This section is primarily populated by items from the previous session's Action Items.
I also include notable deliverables that weren't tracked in the 1:1.

Like a newscaster, I read the bullets in the doc.
Each bullet should focus on brevity and clarity.
The intention is for the other participant to ask questions if needed.

Visual indicators are added to help indicate:
  • ✅ Did the thing! Working as intended.

  • ⚠️ Something’s wrong


Discussion

Items in the discussion section are intended to be prompts for feedback.
I often include similar visual indicators through emoji to include context:
  • 🎉 This is a win, let's discuss
  • 🔴 We're blocked on this
Most Action Items result from these conversations.

Action Items

Action Items are promises made for the next session. Sizing is important.

Bad Action Item: Complete quarterly objective Good Action Item: Generate new JIRA epic to outline quarterly objective work.

One of these items is measurable in a binary Done/Not Done way - The other will be a recurring item that is mostly ignored from session to session.

I also like to utilize Google Tasks.
If working in Google Docs, `@task` will allow assignment of a task directly into my Google Tasks list.

As I update the status in Google Tasks, their state will be reflected in the Meeting doc:


Items of Interest

"Socializing" is built in as part of the Items of Interest section.
This creates space for conversation past the intention of the meeting.

That's it - the meeting is over once the outline is complete. 
It's completely OK to end early - No one ever complains about getting time back.


After the Meeting

Updating the Top Page

On the First page of the 1:1 doc, I keep a monthly breakdown of major results.

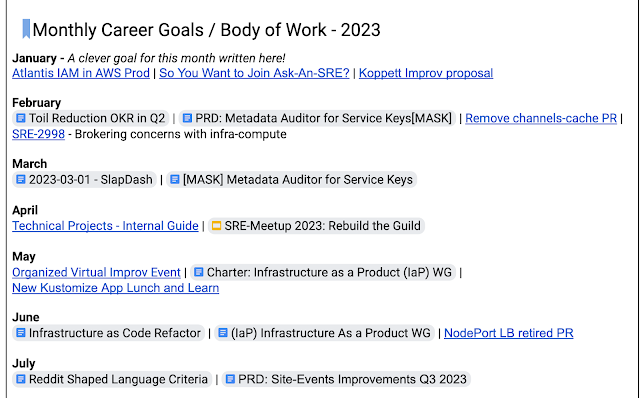
This running list is a curated space that represents the "results" of these meetings.
Most items I list as a "Result" during a 1:1 are also copy/pasted under to their related month.

12 months seems to be a good break point.
Each January I clear the top page, linking to a new doc containing the previous contents.

This is also a great space to include other commonly used links (Like a bookmark for the weekly)
I've found this list to be especially helpful during self-review and manager lead review.


My Last Secret


Most of the practices for this 1:1 workflow also make for great team meetings!

Monday, June 20, 2022

Measuring SRE vs SWE Impact

It's time to start a sprint/planning meeting.

As always, more work exists than engineers. Work must be triaged and prioritized.

The impact of the work is often a factor in deciding what cards rise to the top.

How should Site Reliability Engineers (SRE) measure impact compared to Software Engineers (SWE)?


SWE work is feature focused.

  • What have I added to this project?
  • What bug have I fixed?
  • How many story points am I taking on ?
  • What Epic will I advance with this task?

SWE is a product driven approach, which is valuable but also often opposed to reliability work.


SRE work often focuses on tasks that answer these questions:

  • What Toil will this reduce?
  • Does this work empower other engineers to self-serve a solution?
  • Will this work resolve a near miss that we've been fortunate to avoid?

Often SRE work looks like the reduction of tech debt.

That's not to say that SRE is responsible for tech debt, or should be the "infra grease" for an organization.  

SREs tend to be experienced engineers with a background in SWE, System Administration or even product management.  SREs often engineer solutions to sociotechnical problems.  The most effective use of SRE teams is to position them to rapidly identify and eliminate existing Toil, while driving efforts to increase reliability.

From a systems perspective, reliability is a spectrum.  If the number of things that increase reliability outweigh the choices that reduce resilience, a system is trending towards stability.  

SRE teams should measure the impact of the projects they take on by the amount those projects increase reliability.

Tuesday, November 3, 2020

TinyPilot: A fun project for both New and Seasoned Sysadmins

 I recently read about a do it yourself KVM called TinyPilot, by Michael Lynch.

TinyPilot provides a KVM (Keyboard Video & Mouse) connection to any machine, for the low cost of around $150, or about an hour of your time and whatever Raspberry Pi parts you have sitting around.

I have an old Dell R800 with an older version of iDRAC.  The iDRAC fails every reasonable attempt to manage the server through the browser, and can't be updated any further. I don't keep a VGA monitor around / connected in my garage, it's a major chore anytime I do something that requires a reboot on that system.

I like this as a weekend project for a few reasons:

  • If you're new to working with home lab hardware, this is a nice stretch project with an immediately useful result.
  • If You've a seasoned home lab tinkerer or "professional" - This is much easier and cheaper than a traditional KVM, and likely solves a common annoyance.
  • Regardless, it's an inexpensive way to play with a Raspberry Pi and potentially support a useful open source project.
While following the tinypilot guide, I ran into a few problems:

I didn't have a Rasp 4 lying around (Only a 2) - This turned out to be a big issue, you absolutely need a 4.

I didn't have a 32 gig SD card available (only a 4gig) - This wasn't an issue, worked fine.

No HDMI port on my old R800 - I tested on another machine, and picked up a hdmi to VGA dongle.

The actual install of TinyPilot on my Raspberry Pi 2 took about 45min.
 This is likely because my Pi 2 is pretty old. No effort was required on my part- outside of kicking off the install script. The installer kicks off an Ansible playbook on the Pi.  I'm fine with waiting as it put the Pi 2 to good use, and I actually avoid some of the power concerns with the recommended Pi 4. 

PiRecommended PSU current capacityMaximum total USB peripheral current drawTypical bare-board active current consumption
Raspberry Pi 21.8A1.2A350mA
Raspberry 
Pi 4  
3.0A1.2A600mA
Raspberry Pi FAQ

Update:
As mentioned above - The Raspberry 4 was definitely required. My Pi 2 loaded the web GUI, and even displayed the desktop - but any attempt to interact failed. I suspect either the CPU/RAM on the Pi 2 wasn't enough. I performed a fresh install on my Pi 4, which completed in under 10min.  


Wednesday, February 19, 2020

Change OSX Hostname - For Real!

This was enough of a headache today that I wanted to keep a record.

If the hostname of your MacBook doesn't match across various places (Terminal, System Preferences, iCloud) - you can fix it with the steps in this Ask Different question.

I've also included the answer here, for my own sanity.

  1. Open a terminal.
  2. Type the following command to change the primary hostname of your Mac:
    This is your fully qualified hostname, for example myMac.domain.com
    sudo scutil --set HostName <new host name>
    
  3. Type the following command to change the Bonjour hostname of your Mac:
    This is the name usable on the local network, for example myMac.local.
    sudo scutil --set LocalHostName <new host name>
    
  4. If you also want to change the computer name, type the following command:
    This is the user-friendly computer name you see in Finder, for example myMac.
    sudo scutil --set ComputerName <new name>
    
  5. Flush the DNS cache by typing:
    dscacheutil -flushcache
    
  6. Restart your Mac.

Sunday, December 15, 2019

Expect the Unexpected! Lisa '19

Excited to share the video from my Lisa 2019 talk with Brian Artschwager.

Ops teams have a higher volume of unplanned work than any other similarly sized team.

This talk will attempt to explain the details of a practical method of managing unplanned work, though the engaging story of how our team used this method to systematically process our previously unending backlog.


Sunday, November 10, 2019

How The ISE team at Stack Overflow does Python Linting


Some time back I wrote this short guide for our internal wiki at Stack.
I'm sharing it here for anyone with an interest in Python linting.
Our team generally subscribes to a modified version of pep8.
Reference: Google Standards for Python

Specifically:
  • We allow long lines up to 120 characters.
  • Classes should be CamelCase
  • Globals FULLY_CAPITALIZED
  • All other variables lower_snake_case
The following are recommended steps using Sublime Text linting with Anaconda.
  1. Install sublime text Package Control
    • From inside sublime text:
    • CTRL + SHIFT + P to open the package control menu 
  2. Install anaconda
    • if you already have it you may need to reinstall anaconda when done
  3. Install Sublime Text Package Resource Viewer 
  4. Update Anaconda Settings
    1. Go to preferences -> Package Settings -> Anaconda
    2. paste anaconda settings into the user settings file 
  5. Using Package resource viewer open your current color scheme 
    1. CTRL + Shift + P - then type color scheme 
    2. Select The Package Resource Viewer option for your color scheme.
    3. Add the color scheme JSON into the Rules section of your color scheme. 
    4. You'll need to do this any time you switch to another color scheme.
If everything worked out, your editor should now look something like this:
(Yellow dots indicate warnings, Red errors, blue spacing mistakes.)
An explanation of the error will appear in the bottom of the editor

Sunday, May 27, 2018

FizzBuzz in Go

I recently started poking around at Go again.
I like to prove I can write FizzBuzz in a new language (without looking up any language-specific syntax).

This is pretty straightforward - sometimes people go with a case statement, but I wasn't sure what kinds of comparisons were allowed in a Go switch.  It might be fun to see if I can perform an evaluation (i%5 ==0), or am limited to specific values (1,'a', false).